The right camera for the job

•August 28, 2011 • Leave a Comment

In my sequence of compositions exercise I explained how using the the discrete but very capable Powershot G10 had let me get some shots I wouldn’t have managed with the 5DMkII (particularly with a  great big white L series 100-400 on the front of it!). Well another weekend and another music festival and its time for the other side of the story.

While there were a whole load of potential shots I didn’t even try to take as the big obvious setup would have certainly been noticed and even a subconscious reaction would have spoilt the shot. But the other side of the story is exactly that, it is a big obvious setup, which more than once just wandering round had people asking to have their photo taken. But more than this it got noticed by the performers on stage on several occasions and the reaction was rather favourable! For example I was spotted lining up the shot below and the singer looked into the camera till I’d taken it and lowered the camera.


So while any camera is always better than none it would seem choice of camera (and lens) can have quite an influence on the resulting image for reasons as much psychological as technical.

A Sequence of Compositions (and a trip back to the 80s)

•August 23, 2011 • Leave a Comment

After a load of total failures at this exercise the Flashback to 80s music festival at Clumber Park looked like it might prove an ideal spot for another attempt! EOS5D with the L series 100-400 should be ideal, well the best laid plans and all that, a finger infection meant on the weekend of the festival I was down to one useful hand so time for a rethink! Well I won;t manage all I had in mind with the SLR but I think the Powershot G10 might produce interesting results as well, with added advantage people will be far less likely to notice me taking their picture and carry on with what they were doing.

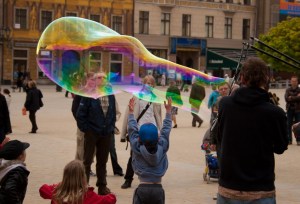
With around 10000 people expected I decided to get the final sequence I had in mind I better arrive early and stray slightly from the brief towards the end of the sequence  getting to the front then recording a sequence as it changed through time and movement around me rather than by me. First shot as I get out out of the car and I’m there early enough to be at the front of the carpark.

Though looks like I’m not the only one getting there early!

Arriving at the ticket barrier and we get our first glimpse of the stage, though everything is still looking very 21st century! Still there is a stage and I guess that is where the action will be so lets see what we can find on our way over there.


Big stage, big screen and deck chairs and picnic tables, guess the 80s generation are showing their age, but lets keep heading for the front, the next couple of shots are just a couple of little candid shots the G10 is so good at, at least half the folks glanced in my direction while I was taking them but no one deviated from what they were doing.

But then again there is certainly some 80s hair on display on the deck chairs!

Spotted the two ladies in the very 80s skirts as I headed to the stage, and when the closer one bent over it was just too good to miss! Had to crop the shot as I was a little far away for the powershot but I’m pretty sure the EOS with huge white L series would have been noticed and I wouldn’t have got this shot. Anyway not quite at the front yet so time to move on!

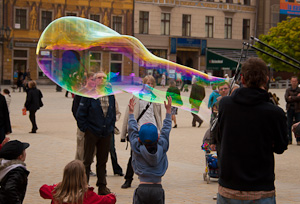
More 80s colour heading to the front!

Getting to the front and it is getting busy but I’ve got myself a good spot and should get some interesting follow on shots over the next hour or two.

On stage the crew are busy setting up for the first act and testing the smoke generators! Time to move closer to stage along the front ready for the acts to start.

The warmup act are doing their stuff so lets see what the crowd think of it!

They certainly seem to be having fun!

This shot is from a little later in the evening but laying the photos out it seemed to fit here better!

So finally time for the big 80s names the crowd was really here to see, here is where I ran up against the limitations of the powershot as after the the first couple of acts it got a bit dark to get useful images.

And it doesn’t get much more 80s than Toyah belting out “I want to be free”!

With the 5d I could have kept shooting but much after this and I was having to ramp the ISO up into the unacceptably noisy settings to get anything with the G10. In the end I took about 30 shots in the walk from the car park to stage but laying them out the sequence here seemed to tell the story best. Many of the other shots are very similar to the ones presented and while they would fit into the sequence I think they would distract from the story being told, in the words of my teenage daughter ‘too much information!’

Object in different positions in the frame

•July 17, 2011 • Leave a Comment

This exercise calls for an object against a large even background. I headed up to the local reservoir to see if the sailing dinghies on the lake would fit the bill but guess the weather was too much for sensible sailors to be out. So time to think again, on wet British summer afternoon even backgrounds don’t get much larger than the grey sky, so I just need to find an object that can be repositioned against it!

This looks promising with a quick snapshot.

But 2 flags in the frame seem to detract from the image, there is no clear point of interest and I find my attention moving from to the other. So for the remaining shots I framed things so just the Union Jack was in shot.

I took several shots with the flag at different points in the photo and the sequence that follows shows them in the order of how well I think they work, with the most effective first.

Rather to my surprise I find a pretty much central placement of the flag seems most effective.


Again keeping it pretty central but moving it reduces the impact slightly as the colour of flag seems to be lost in the grey of the background.

Moving the flag to the edge and the composition is starting to look altogether rather squished! The feeling is similar which ever edge it is against or whichever way it blowing. The flag is prominent against the background.

Moving it into a corner squashes things even more and the colour of flag is lost against the large area of grey.

The central position being the best was rather a surprise to me and clearly makes the point about what works in one image not working in another. Centrally placed subject usually seem boring to me but the fact this isn’t always the case was very strongly made by this photo from the Magnum Photo of the week recently. In the Magnum photo (yes the tree isn’t quite central but the photo is almost a strong if you crop the bottom slightly to make it central) I think the very strong symmetry coupled to the wheel tracks leading to the tree which give it the impact. With the flag I think it is the movement captured as much as the position which makes it appeal most.

Playing with light

•July 12, 2011 • Leave a Comment

I’ve scanned through the course and read the forums so know some of the later work is around lighting. Up till now I’ve just tended to shoot with whatever light is there but Emily sitting in the window a couple of weeks ago got me thinking! Then a couple of days ago the lighting I had in my mind appeared so we set up this photo.

The main source of light is our nearest star, bright mid afternoon sunlight from a cloudless sky back lighting Emily through the window (looking out of the window you face pretty much due east) by being bounced off the white painted house directly across the single track lane we live on (now that is one big reflector, don’t think it would fit in my camera kit!). Then some artificial light from the 5 x 40w halogen bulbs in the ceiling fitting about half way between me and Em and slightly to my right which is all diffused and scattered by the Swarovski crystal light fitting.

Looking at the colours around her neck and the colour of the t shirt which is really white I guess the AWB picked up on the strong daylight (confirmed by the as shot colour temp of 5000K) so giving the artificial light the warm orange feeling which I think contrasts nicely with the stark back lighting. Adjusting the image to the 2700K colour temperature of the halogen lights gives natural skin tones and a white t shirt but everything in the background takes on a rather strange blue tint. An added complication of using different light sources in one shot I guess.

1/400 sec at f5 brought the silhouette effect I was looking for and the wide aperture helped throw the glazing bars on the window and lamp behind her out of focus. There wasn’t a way to set this up without one of of the glazing bars growing out of the top of her head, at the moment I’m not sure if I should leave the vertical bar as it or have a play in Photoshop to either get rid of it all together or thin it down to the width of the horizontal bars.

Panning and shutter speed

•July 11, 2011 • Leave a Comment

Possibly a slightly more complicated use of panning than the exercise called for in that my moving target (my daughter Emily) was moving in an arc while rocking in the swing seat and swinging her legs in another arc but I think the resulting shots show quite nicely the effect of shutter speed and panning the camera in a rather interesting way. Passing cars, bikes, trains etc. would have been easy!

First off a slow shot, 1/8sec

Lots of blur in the background and in the subject, the movement of the  swing chain is clearly visible and the image has an almost abstract quality, with the top half of her legs having pretty much vanished into the background. I guess if the lens had gone smaller for a slower shutter speed a very abstract picture would have resulted.

Speeding up to 1/13 sec and the difference is already very clear

Different planes of movement are starting to become apparent, while the chains are taking on definition there is clearly panning induced blur in the background at an angle of about 30 degrees mirroring the direction of panning. Emily is starting to become more ‘solid’ than in the slower shot and the backwards and forwards motion of her head as she swings is given away by the motion blur of her hair.

Another shot at 1/13 while not really the best in terms of illustrating the point of the exercise is my favourite in terms of showing the movement of the scene.

The background panning blur is apparent again but there is a load of rotation blur on Emily as she throws her body back and legs forward to make the swing bigger, but strangely her bright red Doc Martins are almost sharp which seems to emphasise the movement in the rest of the frame.

Speeding up the shutter a bit more and things are starting to become almost clear. 1/25 sec

While the panning wasn’t tracking her arc movement perfectly detail is starting to become clear in Emily’s hair and the the folds in her cardigan while there is much stronger movement in the background in the direction of the panning.

Going to 1/50 sec and we have what I think is the worst photo in the set.

At this speed the background image is simply starting to look out of focus and while I’ve managed to track the arc movement pretty well the movements in other directions blur the effect.

At 1/125 sec things are starting to become sharp.

But the sense of motion is lost, look very close at the bottom left and a little movement blur is seen in the swing post but I don’t see an overall feeling of movement in the photo.

Finally 1/500 sec and it is frozen movement

Action is frozen but it looks like the autofocus picked up on the striped t shirt of the boy behind Emily so she is a little soft. Lesson is learnt, when trying to do panned action shots pick on a single focus point in the autofocus system and make sure it is on the target of the shot!

Moved to WordPress

•July 10, 2011 • Leave a Comment

Well this blog started life on another well known blogging site. As a starting out photographer who maybe one day will manage to earn a little back on all his photo kit spend this article linked from the OCA Flickr group had me a little worried so over to WordPress it is!

I think I’ve made sure everything has imported OK but if you’ve found something that doesn’t work please let me know.

Shutters and movement

•July 4, 2011 • Leave a Comment

Here are my shots for the exercise looking at how different shutter speeds give a sense of movement. I didn’t quite do it according to the book, far too small a range in f stops (F4 to f22) on the 24-105 lens to cope with the shutter speed range of 30sec to 1/8000sec of the 5D MkII but a range from 1/13 to 1/400 nicely illustrates thing along with an illustration of smaller f number = smaller depth of field. Now for the photos, not the most exciting of compositions I know but the scientist in me wanted to illustrate the point of the exercise as much as possible. I set this up to give me several different movements. First is the nearest duck which was having a good old scratch, next the almost chaotic movement of the water over the rocks to the right of the ducks and finally the vertical movement of the background waterfall. For all the shots focus was on the closest duck

f22 1/13

In this slow shutter speed shot the water and the duck show movement blur looking effective for the water (particularly the waterfall which the narrow aperture leaves in focus).

f20 1/25

My favorite, the slightly subtler blurring of the water allows the green of the rocks to show through and there is enough blurring of the ducks head to suggest movement without looking to out of focus.

Moving through the series all give slightly different effects of motion blur which would vertainly have use in different aspects of photography. By 1/250sec motion in the scene is effectively frozen though depth of field effects are starting to put the background out of focus.

f14 1/50sec
f10 1/80sec
f9 1/124
f6.3 1/250
f4.5 1/400sec

Rule of thirds

•June 27, 2011 • Leave a Comment

I haven’t started the composition part of the the course yet as I’m trying to come up with something a bit more interesting than passing traffic for the panning exercise. If pushed on what I know about the subject already I think I could only come up with the rule of thirds. Every week I some really great photography dropping into my in-box thanks to the Magnum picture of the week service.
Last week it was this photo by Chien-Chi, http://www.magnumphotos.com/C.aspx?VP3=ViewBox_VPage&IID=2K7O3RJ2VSX9&CT=Image&IT=ZoomImage01_VForm
If ever a picture displayed the rule this one has it by the bucket load! Vertically the couples eyes are about on the 1/3 up line and the tops of their heads 1/3 down, each of their noses are about 1/3 in from the edge, that and the looks in the eyes of the couple all add up to a very engaging picture.

Lightroom plugin now registered!

•June 25, 2011 • Leave a Comment

And one more post of the same photo now the size restriction is gone!

This shot was taken a couple of years ago on a lovely spring day in the main square of Wroclaw, Poland. Everyone was so focused on the huge bubbles being blown I could happily wander around with the dSLR (EOS 20D with a Sigma 18-55mm  for this day) snapping away candid shots that would normally have been noticed by everyone in the frame!

Lightroom plugin

•June 25, 2011 • Leave a Comment

This is just a quick test of uploading images direct from Lightroom using a rather useful little plugin from http://photographers-toolbox.com . Once I’ve made sure this works its back to doing battle with printer profiling to try and make what comes out on paper match what I see on my nicely calibrated screen.

As it seems to working I think its time to make a donation to remove the 300 pixel longest side limit on the free version.